
Desserts
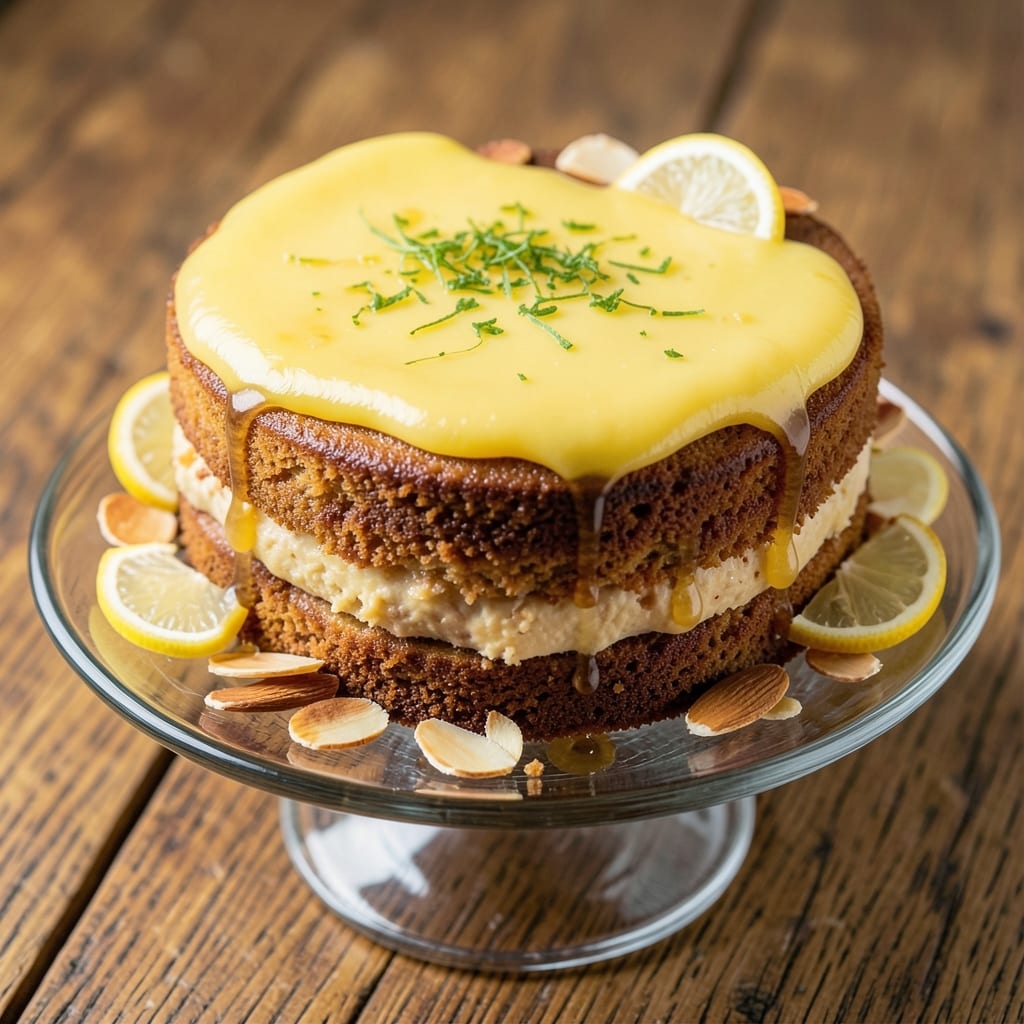
This Amalfi cake recipe brings the sun-drenched flavors of Italy’s Amalfi Coast to your kitchen with its signature citrus-infused layers. 💛 The secret lies in delicate sponge cakes soaked in lemon zest-infused syrup, layered with velvety custard and light whipped cream—a dessert that rivals any Italian café’s masterpiece. What makes this version special is the balance of brightness and richness, achieved through precise technique and quality ingredients.
The cake’s magic starts with three key components: a tender citrus sponge, a silky lemon custard filling, and airy whipped cream. Each layer is carefully assembled to create that iconic "tiramisu-like" texture without the coffee. The lemon zest in both the sponge and syrup adds a bright, aromatic note that cuts through the richness, making every bite feel like a taste of the Mediterranean.
By the time you slice into this cake, you’ll see layers of golden sponge separated by creamy custard and fluffy whipped cream—each bite offering a perfect harmony of textures and flavors. The sponge remains moist without being soggy, while the custard stays smooth and the whipped cream adds just the right amount of lightness. This is the kind of dessert that feels both elegant and approachable, perfect for special occasions or when you simply crave something indulgent yet balanced.
Whether you stick to the classic lemon version or explore variations like coffee-infused custard or a gluten-free sponge, this recipe delivers restaurant-quality results at home. The instructions are designed to guide you through each step, ensuring your Amalfi cake turns out as beautifully layered and flavorful as the ones you’d find in Italy.
Ingredients for amalfi cake
Bright citrus zest, tender sponge layers, and velvety custard—this is your Italian café dessert at home.
| Ingredient | Amount | Notes |
|---|---|---|
| All-Purpose Flour 🌾 | 3 cups | Sifted for light texture |
| Granulated Sugar 🍬 | 2 cups | Divided for sponge and syrup |
| Unsalted Butter 🧈 | 1 cup | Room temperature, full-fat |
| Large Eggs 🥚 | 6 whole | Room temperature, separated |
| Lemon Zest 🍋 | 2 tbsp | Fresh, finely grated |
| Fresh Lemons 🍋 | 3 whole | Juiced for syrup and sponge |
| Milk 🥛 | 1 ½ cups | Whole milk preferred |
| Vanilla Extract 🌿 | 1 tbsp | Pure, high-quality |
| Heavy Whipping Cream 🥛 | 3 cups | Cold, full-fat |
| Powdered Sugar 🍬 | 1 cup | For whipped cream |
| Salt 🧂 | ½ tsp | Fine sea salt |
| Cornstarch 🌾 | 2 tbsp | For custard smoothness |
The lemon zest is where the magic happens—fresh is non-negotiable. Zest from organic lemons at Whole Foods or your local farmers market has the most vibrant color and flavor. If you can only find conventional, make sure the lemons are firm and smell intense. For the butter, Plugrá or Land O'Lakes work well, but nothing beats European-style unsalted. Room temperature is key—press a finger into it; if it leaves a slight indent, it's ready. The flour? King Arthur or Gold Medal are my go-tos for that tender crumb. Sift it like you mean it—no lumps allowed.
No fresh lemons? Bottled lemon juice plus extra zest works in a pinch, but the flavor won't be as bright. Running out of powdered sugar? Granulated sugar blended into a fine powder does the trick. For the custard, if cornstarch is unavailable, arrowroot powder at the same amount works too. The heavy cream is crucial—Trader Joe's or store-brand both whip beautifully, but avoid ultra-pasteurized if you can. And for the eggs? Pasture-raised from local farms add a richer flavor, but store-bought works perfectly fine. Separate them carefully—no yolk bits in your meringue!
Keep the zest in an airtight container in the fridge for up to 2 weeks, though it's best used fresh. The butter and eggs stay fresh in the fridge for 3 months and 1 month respectively, but use them sooner for peak flavor. The whipped cream? Make it fresh the day you assemble the cake—it won't hold its shape overnight. Store the assembled cake in the fridge for up to 3 days, though it's best enjoyed within 24 hours. Slice with a warm knife for cleaner cuts, and always serve at room temperature for that café-quality experience.
Why You'll Love This Recipe
- No-Fuss Layers: This cake comes together in one bowl—no fancy techniques, just creaming butter and sugar until light, then folding in lemon zest that brightens everything. Honestly, I’ve made it while chatting with my kid about their day, and it still turns out tender and golden.
- Zesty Magic: That lemon zest? It’s the star—bright, citrusy, and just enough to make every bite feel like a little vacation. The butter makes it rich, but the sugar and eggs keep it from being too heavy, so it’s light yet satisfying.
- Picnic or Party: Slice it for a potluck, pack it for a beach day, or serve it at a brunch—it’s equally at home anywhere. Between us, I’ve even used it as a base for a dessert charcuterie board (yes, even on a Tuesday night).
- Budget-Friendly Luxury: You’re using pantry staples here—flour, sugar, butter—and the eggs stretch the richness. I’ll be real: it’s the kind of cake that makes you feel fancy without breaking the bank, and leftovers? They disappear faster than you can say “second slice.”
Step-by-step instructions for layered citrus cake perfection
Here's how to build that iconic Italian café-style cake with tender sponge, zesty lemon layers, and fluffy whipped cream.
👨🍳 Step 1: Prepare the Lemon Syrup and Whipped Cream
Start by making the lemon syrup that will infuse every layer with bright citrus flavor. In a small saucepan, combine the juice from 2 of the 3 whole fresh lemons, ½ cup of the 2 cups granulated sugar, and 1 cup of the 1.5 cups milk. Bring to a gentle simmer over medium heat for 5-7 minutes until slightly thickened and reduced by about ¼. Let it cool completely—this syrup will keep your cake moist and tangy.
While the syrup cools, whip the 3 cups heavy whipping cream with the 1 cup powdered sugar and 1 tbsp vanilla extract until stiff peaks form. Fold this into the cake later for that signature Italian café texture. I like to do this step first so it can chill in the fridge while I work on the sponge—it gives me a head start on assembly.
👨🍳 Step 2: Bake the Citrus-Infused Sponge Layers
Preheat your oven to 350°F and grease three 8-inch round cake pans with butter. Sift the 3 cups all-purpose flour with the 0.5 tsp salt into a bowl—this prevents lumps and gives a lighter texture. In a separate large bowl, beat the 1 cup unsalted butter with 1 cup of the 2 cups granulated sugar until light and fluffy.
Add the 6 whole large eggs one at a time, beating well after each addition. Fold in the 2 tbsp lemon zest, the remaining ½ cup granulated sugar, and the cooled lemon syrup. Divide the batter evenly among the three pans. Bake for 25-30 minutes until a toothpick comes out clean. Let the layers cool in their pans for 10 minutes before transferring to a wire rack.
🥘 Step 3: Assemble the Layers with Custard Filling
Here's where the magic happens. Place the first cake layer on a serving plate. Spread ½ cup of the lemon syrup evenly over the top, then add ½ of the whipped cream. Repeat with the second layer, then the third. The syrup keeps everything moist while the cream adds that signature fluffy texture between layers.
For the final touch, make a quick custard filling by whisking the 2 tbsp cornstarch with ¼ cup milk, then slowly adding it to the remaining ½ cup milk and ¼ cup granulated sugar in a saucepan. Cook over medium heat until thickened—about 3-5 minutes. Let it cool slightly before spreading over the top layer. This custard adds a silky contrast to the citrusy sponge.
🔪 Step 4: Garnish and Chill for Maximum Flavor
Once assembled, refrigerate the cake for at least 4 hours (overnight is best). This chilling time lets the flavors meld and the layers set properly. Before serving, dust the top with additional lemon zest and a few thin lemon slices for that authentic Amalfi café presentation.
Slice into wedges and serve each piece with a dollop of extra whipped cream. The contrast between the tender sponge, zesty syrup, and creamy layers will transport you straight to the Amalfi coast. Trust me—this is the moment that makes all the effort worthwhile!
Pro Tips For Making Amalfi Cake
- Weigh Your Butter: Don’t eyeball that butter—this cake needs precision. Use a kitchen scale for the ½ cup (113g) and pack it lightly into the measuring cup. Too much air? Your cake will end up dense. Too little? It’ll collapse faster than a soufflé in a draft.
- Zest First, Then Juice: Grate that lemon zest fresh and immediately fold it into the butter-sugar mix—don’t let it sit. The oils in the zest oxidize fast, turning bitter. If you’re using juice too, strain it well and add it last, or your cake will taste like lemonade.
- Bake Until Springy: Test doneness by pressing the center: it should bounce back slowly, not instantly. If it springs right up, it’s overdone. I learned this the hard way—overbaked Amalfi cake turns gummy. Pull it when the edges are golden and the internal temp hits 205°F (96°C).
- Chill the Batter: Let the batter rest 10 minutes after mixing—yes, even if you’re eager. This lets the flour hydrate and the eggs stabilize. Skipping this? You’ll get tunnels or a cake that deflates like a sad balloon. (Trust me, I’ve seen it.)
Storing and reheating this recipe
Refrigerator Storage
Store your assembled Amalfi cake in an airtight container (I love using Pyrex glass containers) and keep it refrigerated for up to 3 days. The cake actually tastes better the next day as the flavors meld together beautifully. Just
Freezer Storage
For longer storage, wrap the cake tightly in plastic wrap followed by aluminum foil to prevent freezer burn. Place it in a freezer-safe container and store for up to 2 months. When ready to serve, thaw it in the fridge overnight. The texture remains intact, though the whipped cream may lose some airiness—just whip a fresh dollop on top before serving.
Reheating for Best Texture
If you've refrigerated the cake, let it sit at room temperature for 20-30 minutes before serving. For a quick texture boost, gently warm the slices in the microwave for 10-15 seconds on 50% power—this reactivates the whipped cream slightly without overcooking the sponge. Always serve with a fresh dollop of whipped cream for that authentic café experience. ✨
Garnish Refresh
Before serving, always refresh the garnishes. Sprinkle with extra lemon zest and add thin lemon slices for that vibrant Amalfi touch. A few toasted almonds or crushed pistachios add crunch and elevate the presentation. I like to dust the top with a little powdered sugar right before slicing for a snowy finish.
Make-Ahead Assembly
Assemble the cake layers 24 hours ahead of serving and refrigerate. This gives the flavors time to develop fully. If you're baking ahead, store the unassembled sponge layers in the fridge for up to 2 days—just wrap them tightly in plastic. Assemble when ready to serve, then chill again for 4 hours before garnishing. This strategy saves time while maximizing flavor development. 💡
Transporting Tips
For events, transport the cake in a cool insulated bag with an ice pack to maintain temperature. If traveling longer distances, wrap the cake in towel-lined boxes for extra protection. Keep it refrigerated until serving time—this prevents the whipped cream from melting and keeps the sponge layers intact. A little extra effort ensures your cake arrives as beautifully as it was made. 🚗
Nutrition facts
Frequently asked questions
Can I make this Amalfi cake without fresh lemon zest?
You can substitute with 2 teaspoons of bottled lemon juice plus 1 teaspoon of dried lemon peel, but fresh zest gives the signature bright, aromatic flavor. For best results, use organic lemons—their zest is more vibrant and flavorful. If you're in a pinch, a splash of high-quality lemon extract (½ teaspoon) can help, but it won't replicate the texture or aroma of fresh zest.
Why does my sponge layer turn out dense instead of light?
Overmixing the batter or using cold eggs/butter are the most common culprits. Always beat eggs and butter separately until room temperature, and fold dry ingredients gently. Another trick: sift the flour with salt first to avoid lumps, and don't overbake—pull the cake when a toothpick comes out clean (around 25-30 minutes at 350°F).
How do I adapt this recipe for gluten-free baking?
Replace the all-purpose flour with a 1:1 gluten-free baking flour blend (like Bob's Red Mill) and add ½ teaspoon xanthan gum if not already included. For the custard, use a gluten-free thickener like cornstarch or arrowroot. The texture will be slightly different but still delicious—just expect a denser sponge. Test with a small batch first to adjust ratios.
Can I use store-bought custard instead of making it from scratch?
High-quality store-bought vanilla custard works perfectly—just ensure it's not too runny. For the best texture, warm it slightly before spreading between layers. If using instant pudding mix, thin it with a splash of milk to mimic the silky consistency of homemade custard. The key is to avoid watery fillings that can make the sponge soggy.
What's the secret to making the whipped cream hold its shape?
Use cold, full-fat heavy whipping cream straight from the fridge and avoid overwhipping. Add powdered sugar gradually while whipping to stabilize the peaks. For extra insurance, chill your mixing bowl and beaters for 10 minutes before starting. If the cream starts to weep, fold in a spoonful of the cooled custard to reinforce the structure.