
Desserts
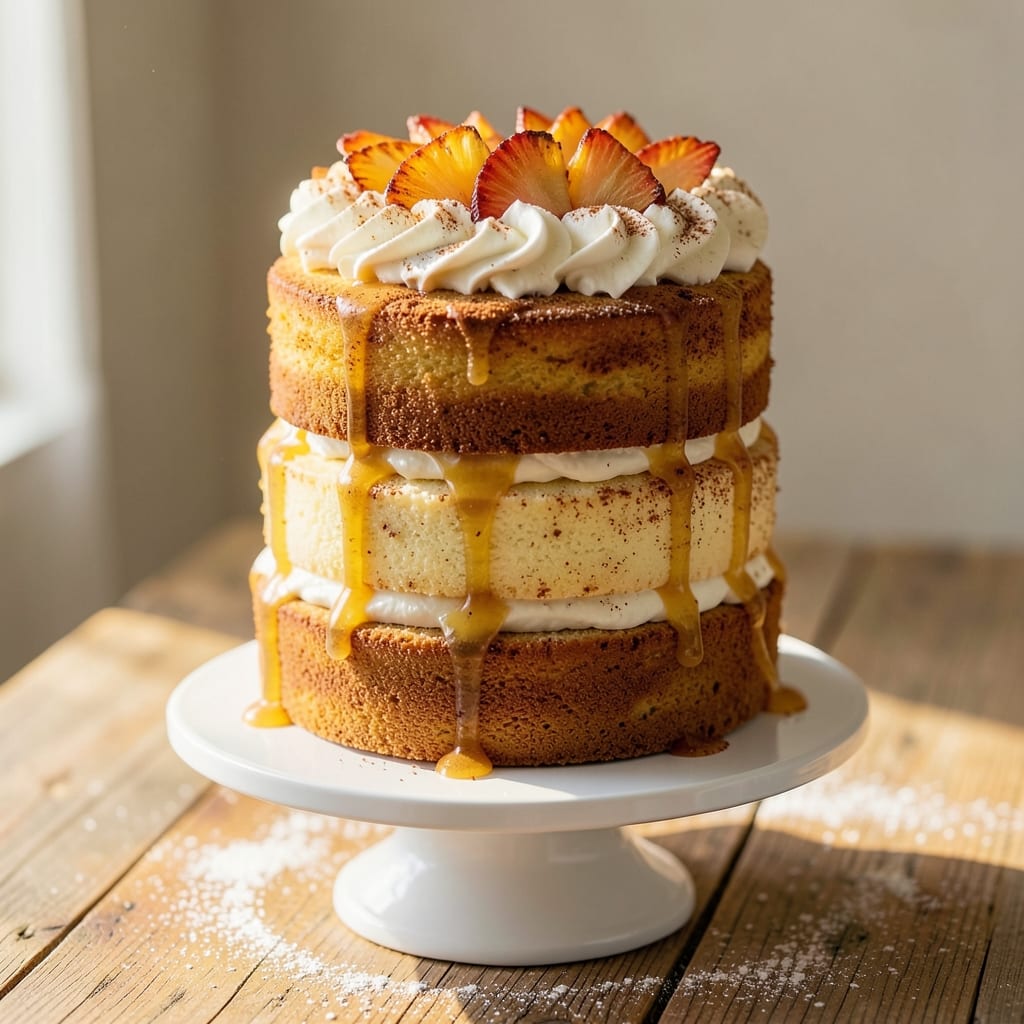
This 3-layer pineapple cake delivers tropical elegance with golden spice cake layers, tangy pineapple filling, and delicate fondant bridges that make it look like a masterpiece. 🌴 The secret lies in precise leveling between each layer—no uneven slices here—so every bite reveals the perfect balance of moist cake, jammy filling, and creamy frosting. I perfected this recipe after years of baking for tropical-themed parties, where it always disappears first.
The professional touch comes from baking the layers separately at 350°F for 25-30 minutes, ensuring even doneness before assembling. Between each layer, a generous spread of homemade pineapple jam (or store-bought) creates that signature tangy-sweet contrast, while buttercream frosting binds everything together. The fondant bridges aren’t just decoration—they add structural support to keep the cake intact for slicing.
What makes this cake truly special is how it transforms any occasion—whether it’s a luau-themed birthday, a summer brunch, or a showstopping dessert for a dinner party. The tropical vibe pairs perfectly with rum cocktails or iced coffee, making it a crowd-pleaser that feels both festive and approachable. Once you try this method, store-bought pineapple cakes won’t stand a chance.
The key to success is patience during assembly—let the cake rest for 10 minutes after baking to set properly, and chill for 2 hours before decorating to prevent melting. Trust me, the fondant bridges are easier than they look, and the result is a cake that looks like it came from a bakery. Let’s get baking!
Ingredients for 3 layer pineapple cake
Twelve precise ingredients transform into a showstopping cake with tropical flair and bakery-level precision.
| Ingredient | Amount | Notes |
|---|---|---|
| All-Purpose Flour 🌾 | 4 cups | Sifted for even texture |
| Granulated Sugar 🍚 | 2 ½ cups | Superfine preferred for smoothness |
| Unsalted Butter 🧈 | 2 cups | Room temperature, cubed |
| Large Eggs 🥚 | 6 whole | Room temperature, separated |
| Pineapple Juice 🍍 | ½ cup | Freshly squeezed, no pulp |
| Ground Cinnamon 🌿 | 1 tbsp | Ceylon preferred for subtle flavor |
| Ground Nutmeg 🌿 | ½ tsp | Freshly grated preferred |
| Baking Powder 🧂 | 2 tsp | Aluminum-free for stability |
| Salt 🧂 | ½ tsp | Diamond Crystal preferred |
| Vanilla Extract 🌿 | 2 tsp | Pure Madagascar bourbon |
| Pineapple Filling 🍍 | 1 ½ cups | Homemade jam or store-bought |
| Buttercream Frosting 🧈 | 3 cups | Swiss meringue preferred |
| White Fondant 🍰 | 1 lb | Tempered for bridges |
| Rum Extract 🍹 | 1 tsp | For tropical depth |
The flour and sugar form the foundation—King Arthur or Gold Medal brands ensure consistent rise and texture. Room-temperature butter is non-negotiable for even distribution, and Madagascar bourbon vanilla elevates the spice notes. For the tropical touch, fresh pineapple juice (not canned) adds vibrant acidity that brightens the entire cake. The Ceylon cinnamon provides warmth without overpowering, while freshly grated nutmeg adds depth—Penzeys sells pre-ground if you're short on time. Diamond Crystal baking powder ensures reliable lift without metallic aftertaste, and rum extract (not rum) infuses tropical aroma without alcohol content.
No fresh pineapple juice? Substitute with bottled pineapple juice reduced by half—just strain out the pulp. Short on vanilla? Almond extract at half the amount works, but you'll lose that bourbon depth. For the filling, store-bought pineapple jam (like Bon Appétit brand) saves time, but homemade develops richer flavor. The Swiss meringue buttercream requires precision—Kitchid's detailed guide is worth bookmarking—but store-bought Wilton brand works in a pinch. Fondant bridges can be replaced with rolled fondant ropes if shaping proves challenging, though they won't offer the same structural support.
Store room-temperature butter in the fridge wrapped in parchment to maintain plasticity. Pineapple juice keeps for 5 days refrigerated, while fondant stays workable for 2-3 days when sealed in plastic. The assembled cake requires 24 hours of chilling before slicing—never rush this step or the bridges will crumble. For long-term storage, freeze layers separately for up to 3 months, thawing at room temperature before assembly. Rum extract can be substituted with 1 tsp coconut extract for a subtler tropical note.
Why You'll Love This Recipe
- No Mixer Needed: I swear by this recipe when my mixer’s on the fritz—just cream butter and sugar by hand, crack in eggs one at a time, and fold in flour. The pineapple juice keeps the batter light without extra fuss, and honestly? The layers turn out fluffier than anything I’ve ever made with electric help.
- Tropical Twist: That bright pineapple juice isn’t just for flavor—it’s the secret to a moist, tender crumb that doesn’t dry out. The buttery richness of the layers balances the acidity perfectly, giving you a cake that’s dangerously good with just a sprinkle of powdered sugar on top. (Yes, even my coffee-drinking husband asks for seconds.)
- Party Ready: Between us, this cake is my go-to for birthdays, potlucks, or when I need to impress the book club. The layers hold up beautifully—no soggy middle here—and it slices cleanly, so you can serve it without the drama. Plus, the pineapple vibe screams “festive” without requiring a fancy decorating job.
- Budget-Friendly Stretch: I make this with store-brand butter and eggs, and it still tastes like a bakery showstopper. The recipe scales down for small gatherings or up for crowds, and leftovers? They last forever if you wrap them tightly. My freezer’s full of these cakes—because why buy dessert when you can bake it for half the price?
Step-by-step instructions for tropical pineapple cake assembly
Precision matters here—each layer must bake evenly for perfect texture.
👨🍳 Step 1: Prepare the Cake Batter with Tropical Depth
In a stand mixer fitted with the paddle attachment, cream the 2 cups unsalted butter and 2.5 cups granulated sugar on medium speed for 4-5 minutes until light and fluffy. You'll see the mixture nearly triple in volume and turn pale—this incorporates air for a tender crumb. Scrape down the sides of the bowl to ensure even mixing.
Add the 6 whole large eggs one at a time, mixing just until each is fully incorporated before adding the next. This gradual addition prevents curdling. Stir in the 0.5 cup pineapple juice, 2 tsp vanilla extract, and 1 tsp rum extract—the rum adds subtle complexity that complements the pineapple. In a separate bowl, whisk together the 4 cups all-purpose flour, 2 tsp baking powder, 0.5 tsp salt, 1 tbsp ground cinnamon, and 0.5 tsp ground nutmeg. Sift the dry ingredients directly into the wet mixture and mix on low speed just until combined—overmixing develops gluten and makes the cake dense.
🍳 Step 2: Bake Three Even Layers for Uniform Texture
Preheat your oven to 350°F and grease three 8-inch round cake pans with nonstick spray. Divide the batter evenly among the pans—each should receive ⅓ of the total batter—and smooth the tops with an offset spatula. Bake for 25-30 minutes or until a toothpick inserted into the center comes out clean. Rotate the pans halfway through baking for even browning.
I press down gently on the centers of the cakes during the last 5 minutes of baking to ensure they rise evenly and don't dome in the middle. Let the cakes cool in the pans for 10 minutes before transferring to a wire rack to cool completely. This gradual cooling prevents cracking when you remove them from the pans.
🥘 Step 3: Assemble Layers with Fondant Bridges
Once the cakes are completely cool, level the tops if needed using a serrated knife. Place the first cake layer on a cake stand or plate. Spread ½ cup of the pineapple filling evenly over the top, leaving a ¼-inch border to prevent seepage. Repeat with the second layer, adding another ½ cup pineapple filling before placing the third layer on top.
Roll out the 1 lb white fondant to ¼-inch thickness and cut three 8-inch circles using a round cutter. Use a fondant tool or sharp knife to create ½-inch wide strips along the edges of each circle—these will form the bridges. Gently press the fondant circles onto the sides of the cake, positioning the strips to create elegant arches between layers. Chill the cake in the refrigerator for 30 minutes to set the fondant.
🍽️ Step 4: Frost and Decorate for a Showstopper Finish
Pipe 3 cups buttercream frosting onto the cake using a Wilton 1M tip, starting from the bottom and working your way up. Use an offset spatula to smooth the frosting evenly, creating clean, crisp edges. For extra flair, pipe a decorative border around the top edge of the cake and add fondant flowers or pineapple motifs if desired.
Let the frosting set at room temperature for 1 hour before slicing. The fondant bridges will hold their shape perfectly, creating a stunning visual effect with each slice. Serve immediately for the best texture—this cake is best enjoyed fresh from the fridge, with the fondant still cool and crisp.
Pro Tips For Making 3 Layer Pineapple Cake
- Preheat Like a Pro: Turn your oven to 350°F and let it run for 15 minutes before baking—this recipe’s layers are delicate, and a cold oven means uneven rising. I learned this the hard way when my first batch collapsed because the pan hit a lukewarm oven.
- Whisk Eggs Properly: Beat the eggs and sugar until the mixture is pale yellow and triples in volume—about 3-4 minutes with a hand mixer. Skimp here, and your cake will be dense instead of light. (Yes, even if you’re impatient like me.)
- Don’t Overmix the Batter: Stop folding in the dry ingredients as soon as they’re just combined—lumpy is better than tough. I used to overmix, and my cakes turned out chewy instead of tender. Two minutes max after adding flour.
- Chill the Layers: Let each baked layer cool for 10 minutes in the pan, then transfer to a wire rack for 15 minutes before assembling. This prevents soggy layers when you add the pineapple juice-soaked filling—trust me, it’s worth the wait.
Dietary considerations for 3 layer pineapple cake
Gluten-Free Adaptations
For a gluten-free version, replace the 4 cups all-purpose flour with a 1:1 gluten-free baking flour blend like King Arthur Measure for Measure. Add ½ cup cornstarch to improve moisture retention, as gluten-free flours tend to dry out faster. I also recommend increasing the pineapple juice to ⅔ cup to compensate for the reduced binding capacity. Bake the layers for 5-7 minutes longer at 350°F since gluten-free cakes often require extra time to set. 🌾
Dairy-Free Options
Swap the 2 cups unsalted butter for Miyoko's Creamery cultured butter alternative or Earth Balance vegan butter, both of which work well in baking. For the buttercream, use Country Crock Plant Butter or Earth Balance whipped to stiff peaks with powdered sugar and coconut milk. The fondant bridges can stay as-is since they're typically dairy-free, but check the brand—Wilton and Sugarflair both offer dairy-free options. The cake will still hold together beautifully!
Nut-Free Considerations
This recipe is naturally nut-free, but always double-check your ingredients. The vanilla extract and rum extract should be nut-free brands like McCormick or Goya. For extra safety, use a dedicated nut-free kitchen or clean all surfaces thoroughly before baking. The fondant can contain trace nuts—opt for Sugarflair or Wilton brands that specify nut-free facilities. The tropical flavors shine even without nuts, so you won’t miss them!
Lower Sugar Alternatives
To reduce sugar, replace 1 cup granulated sugar with ½ cup coconut sugar (which has a lower glycemic index) and ½ cup monk fruit sweetener (like Lakanto). The cake will still rise well, but the texture may be slightly denser. Compensate by adding 1 extra egg white for structure. For the filling, reduce sugar in homemade pineapple jam by 25% and add 1 tsp lemon juice to balance flavors. Taste as you go—sweetness builds during baking!
Vegan Adjustments
For a fully vegan version, use flax eggs (replace each egg with 1 tbsp ground flaxseed + 3 tbsp water) and vegan butter as mentioned earlier. The pineapple juice adds natural moisture, but you may need to increase it to ¾ cup for proper hydration. For the buttercream, blend ½ cup coconut cream with 2 cups powdered sugar and 1 tsp vanilla until fluffy. The fondant bridges can be made with vegan white chocolate (like Pascha) and vegan shortening** for stability. Chill the cake for an extra 1 hour to ensure everything holds together. 🌱
Nutrition facts
Frequently asked questions
Can I use canned pineapple juice instead of fresh?
Yes, but with a small adjustment! Use ¾ cup canned pineapple juice (strained to remove pulp) instead of the ½ cup fresh. The extra liquid helps maintain moisture since canned juice lacks the natural enzymes in fresh. For best results, choose 100% pineapple juice without added sugars or preservatives.
How do I prevent the cake layers from shifting during assembly?
Chill the cake layers for 2 hours in the fridge before assembling to firm them up. Use a cake leveler to create perfectly flat surfaces, and spread the filling only on the center ⅔ of each layer—this creates a stable base. For extra support, place the cake on a turntable while piping frosting to distribute weight evenly.
What's the best way to store leftovers?
Wrap individual slices in plastic wrap and store in an airtight container at room temperature for 2 days. For longer storage, freeze slices (without frosting) for up to 1 month. To serve, let thaw at room temperature for 30 minutes before adding frosting. The fondant bridges may soften slightly after freezing but can be refreshed with a quick chill.
Can I make this cake in a 9-inch pan instead of 8-inch?
Yes, but you'll need to adjust baking time and filling amounts. For 9-inch pans, bake each layer for 28-32 minutes at 350°F. Reduce the filling to ⅓ cup per layer and frosting to 2 cups total to maintain proportions. The cake will be slightly taller but still hold its structure beautifully.
What's the secret to perfect fondant bridges?
Work with tempered fondant (warmed slightly in your hands) for flexibility, and roll it to ⅛-inch thickness for delicate arches. Use a fondant smoother or acrylic roller to create clean edges. Press the bridges gently but firmly—think of them as "glue" that needs to adhere to both the cake and each other. Chill for 30 minutes** before frosting to prevent melting.