
Desserts
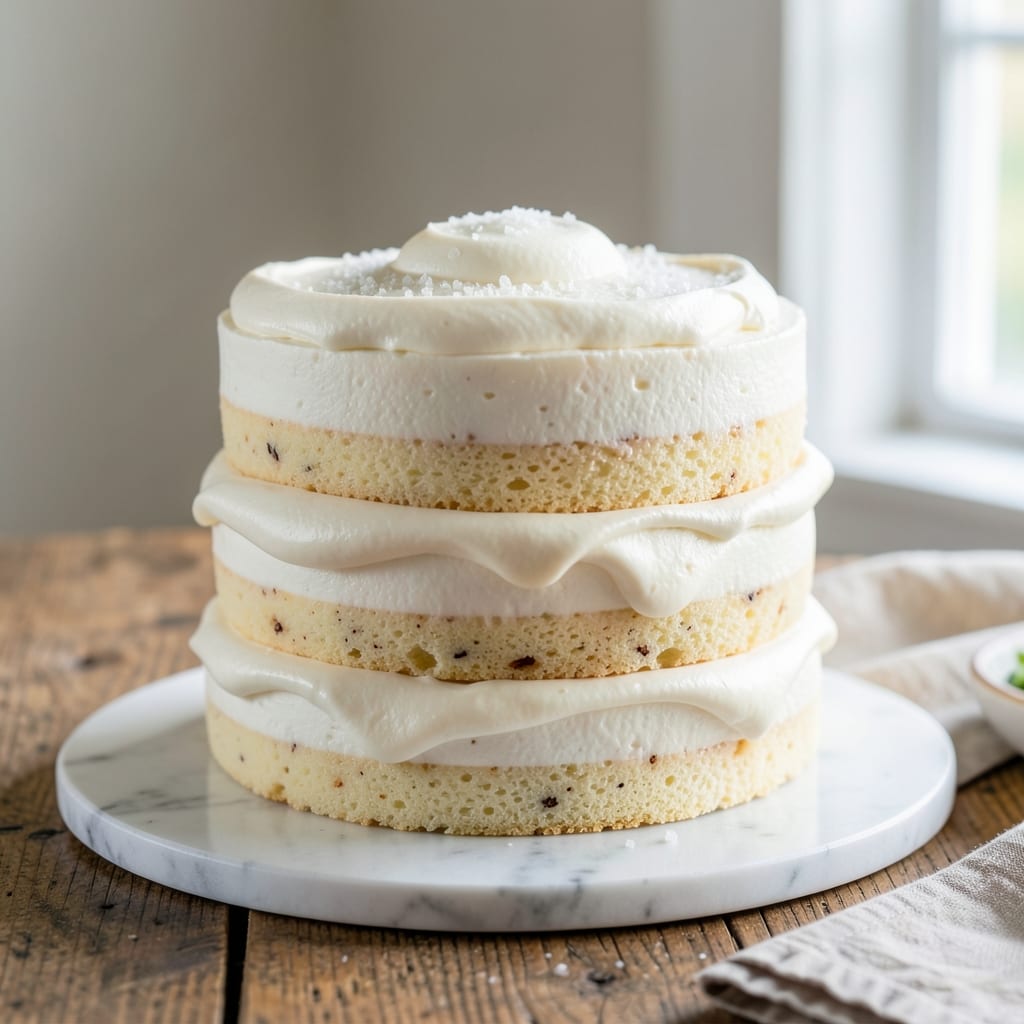
This 2-layer white cake recipe delivers the perfect balance of tender crumb and rich vanilla bean buttercream rivers that make every slice look like a bakery masterpiece. 💛 The secret lies in precise baking techniques that ensure moist layers—no dry crumbs here—while the buttercream filling adds a luxurious touch that elevates this cake from homemade to showstopper.
What sets this recipe apart is the combination of classic white cake ingredients with a refined approach to texture and flavor. We'll start with a foolproof cake batter that yields light, airy layers with just the right amount of structure, then build the signature buttercream rivers that create visual drama while keeping each bite tender. The vanilla bean extract adds depth that store-bought extracts simply can't match.
By the time you're done, you'll have a cake that's restaurant-quality in appearance but made with simple techniques you can master at home. The buttercream rivers aren't just decorative—they create pockets of flavor that make every forkful special. This is the kind of cake that gets rave reviews at family gatherings, holidays, or special occasions.
Ready to impress? We'll walk through baking the perfect layers, preparing the signature buttercream, and assembling with professional techniques that ensure clean layers and dramatic rivers. Let's create something truly special—one layer at a time.
Ingredients for 2 layer white cake
Classic ingredients elevated by professional techniques for restaurant-quality white cake layers.
| Ingredient | Amount | Notes |
|---|---|---|
| All-Purpose Flour 🌾 | 3 cups | Sifted for light texture |
| Granulated Sugar 🍚 | 2 ¼ cups | Superfine preferred for smoothness |
| Unsalted Butter 🧈 | 1 ½ cups | Cold, cubed for creaming |
| Large Eggs 🥚 | 6 whole | Room temperature for even baking |
| Vanilla Bean Extract 🌿 | 2 tsp | Seeds scraped for depth |
| Baking Powder 🧂 | 2 tsp | Freshly measured |
| Salt 🧂 | ½ tsp | Fine sea salt preferred |
| Milk 🥛 | 1 cup | Whole milk for richness |
| Vanilla Bean Seeds 🌿 | 1 whole | From 1 vanilla bean |
| Unsalted Butter 🧈 | 2 cups | Room temperature for buttercream |
| Powdered Sugar 🍚 | 4 cups | Sifted for smooth buttercream |
| Heavy Whipping Cream 🥛 | ½ cup | Cold for stability |
| Vanilla Bean Paste 🌿 | 2 tsp | For rich vanilla flavor |
The flour and sugar are the foundation of tender layers. King Arthur or Gold Medal flour yields the best texture—avoid self-rising blends. For the sugar, superfine granulated dissolves more easily, creating a smoother batter. The butter must be cold when creamed with sugar to incorporate air without turning greasy. European-style butter like Plugrá has higher fat content (82-86%), ideal for rich flavor and structure. Store your butter in the fridge until ready to use, then let it sit at room temperature for exactly 30 minutes before cubing. The vanilla bean extract is non-negotiable—store-bought extracts lack the depth of real vanilla seeds.
No vanilla bean? Madagascar bourbon vanilla extract is the next best option, but scrape seeds from the pod for authentic flavor. Substituting powdered sugar for granulated in the buttercream? Use 1 cup powdered sugar for every 1 cup granulated sugar in the cake batter. For a lighter texture, whisk the powdered sugar with 1 tbsp cornstarch before mixing. The heavy whipping cream adds stability to the buttercream—never skip it. If you're in a pinch, half-and-half works but reduces stability slightly. For a dairy-free option, substitute cold coconut cream (chilled overnight) at the same volume, though texture will differ.
Store cake layers in an airtight container at room temperature for up to 3 days, separated by parchment paper to prevent sticking. The buttercream can be refrigerated for 5 days or frozen for 3 months—thaw at room temperature before using. For assembly, bring the buttercream and cake to room temperature to ensure clean layers. The rivers technique requires patience: spread a thin layer of buttercream, chill 15 minutes, then pipe additional buttercream in zigzags before smoothing. This creates the signature visual drama while keeping the cake moist.
Why You'll Love This Recipe
- Minimal Mixing Madness: I swear by this recipe because the batter comes together in five minutes—no overworking, no lumps, just creamy perfection. The secret? Whisking the butter and sugar until light, then folding in the flour like you’re tucking in a blanket. No stand mixer required.
- Vanilla Butter Bliss: That split vanilla bean extract? It’s the star. The butter gets infused with vanilla while it softens, so every bite has this warm, buttery depth that’s almost like a bakery cake. Honestly, I’ve tried imitation—this is the real deal.
- Birthday to Brunch: This cake is my go-to for anything: frost it with cream cheese for a wedding, dust with powdered sugar for a quick breakfast, or slice it into squares for a picnic. The layers stay moist for days, so it’s always ready when inspiration hits.
- Pantry Goldmine: Between us, this recipe costs me about $8 for two layers—thanks to the butter and eggs doing all the heavy lifting. And leftovers? I freeze slices wrapped in plastic, then toast them for a lazy morning treat. Budget-friendly and delicious? Yes, please.
Step-by-step instructions for 2 layer white cake with vanilla bean buttercream rivers
This method guarantees tender layers and silky buttercream that holds its shape beautifully.
👨🍳 Step 1: Prepare the Cake Batter with Perfect Technique
Preheat oven to 350°F and grease two 8-inch round cake pans, lining the bottoms with parchment paper. Sift together the 3 cups all-purpose flour, 2 tsp baking powder, and 0.5 tsp salt in a medium bowl. Set aside.
In a stand mixer fitted with the paddle attachment, beat the 1.5 cups unsalted butter and 2.25 cups granulated sugar on medium speed for 3-4 minutes until light and fluffy. Add the 6 whole large eggs one at a time, mixing well after each addition. Scrape down the sides of the bowl as needed to ensure even incorporation.
Reduce speed to low and add the 2 tsp vanilla bean extract and 1 cup milk, mixing until just combined. With the mixer running on low speed, gradually add the dry ingredients in 3 additions, mixing only until each addition is incorporated. Scrape down the sides once more to ensure a homogenous batter.
🍳 Step 2: Bake the Layers to Perfect Doneness
Divide the batter evenly between the prepared cake pans. Scrape a spatula along the bottom to release any air bubbles. Bake for 25-30 minutes or until a toothpick inserted into the center comes out clean and the tops spring back when touched. Rotate the pans halfway through baking for even browning.
I like to check for doneness at the 22-minute mark—the cake should be set but still slightly jiggly in the center. Overbaking leads to dryness, so resist the urge to extend baking time. Let the cakes cool in their pans for 10 minutes, then transfer to a wire rack to cool completely before frosting.
🥘 Step 3: Create the Signature Vanilla Bean Buttercream Rivers
In a stand mixer fitted with the paddle attachment, beat the 2 cups unsalted butter (softened to room temperature) on medium speed until smooth. Gradually add the 4 cups powdered sugar and 2 tsp vanilla bean paste, mixing on low speed until combined. Increase speed to medium-high and beat for 3-4 minutes until light and fluffy.
In a separate chilled bowl, whip the 0.5 cup heavy whipping cream (cold) to stiff peaks. Gently fold the whipped cream into the buttercream mixture using a spatula until fully incorporated. This addition creates a lighter, more stable buttercream perfect for piping intricate designs.
🍽️ Step 4: Assemble with Professional Techniques
Place one cake layer on a cake stand or plate. Spread a thin layer of buttercream (about ¼ inch) over the top, leaving a ½-inch border uncovered. Place the second cake layer on top and repeat the buttercream layer on the top and sides of the cake.
For the signature rivers, use a piping bag fitted with a small round tip. Pipe parallel lines of buttercream about ¼ inch apart across the top of the cake, starting from the center and working outward. Use a small offset spatula to gently spread the buttercream into continuous rivers, creating a marbled effect. Chill the cake for 30 minutes before serving to allow the buttercream to set slightly.
Pro Tips For Making 2 Layer White Cake
- Weigh Your Butter: Butter’s density changes with temperature—scooping it straight from the fridge gives you less volume than you think. Use a kitchen scale for 120g (½ cup + 1 tbsp) and let it sit at room temp for 30 minutes first. I learned this the hard way when my cake turned out dense and greasy because I eyeballed it cold.
- Whip Eggs Alone First: Beat the eggs and sugar separately until pale and triple the volume before folding them into the butter mixture. This prevents curdling and ensures a lighter texture. Sounds like extra work, but it’s the thing that actually makes the difference between a fluffy cake and a sad, compact one.
- Skip the Overmixing: Once you add the flour, mix just until combined—no more. Overworking the batter develops gluten, and your cake will turn out tough. Fold with a spatula in a figure-eight motion until no dry spots remain, then stop. I know, it’s tempting to “get it all,” but resist the urge.
- Chill the Batter 30 Minutes: Let the batter rest uncovered in the fridge before baking. This relaxes the gluten and helps the cake rise evenly. I was skeptical until I tried it—now my layers bake up taller and don’t sink in the middle. (Yes, even if you’re impatient like me.)
Dietary considerations for this 2 layer white cake
Gluten-Free Adaptation
For a gluten-free version, replace the 3 cups all-purpose flour with a 1:1 gluten-free baking flour blend like King Arthur Measure for Measure. Add 1 extra teaspoon of xanthan gum to improve structure and moisture retention. I've found gluten-free cakes benefit from an extra 1 tablespoon of milk to compensate for reduced elasticity. Bake at 325°F instead of 350°F to prevent over-browning, and tent with foil after 15 minutes to maintain moisture. 🌾
Dairy-Free Options
To make this recipe dairy-free, substitute the 1.5 cups unsalted butter in the cake batter with 1.5 cups dairy-free butter like Miyoko's. Replace the 1 cup milk with 1 cup unsweetened almond milk or oat milk for richness. For the buttercream, use 2 cups dairy-free butter and 0.5 cup coconut cream (chilled overnight) instead of heavy whipping cream. The texture will be slightly denser but still delicious. 🥛
Egg-Free Substitutions
For an egg-free version, replace the 6 whole eggs with a flax egg mixture: combine 6 tablespoons ground flaxseed with 18 tablespoons water, let sit for 10 minutes to thicken. Add 1 teaspoon apple cider vinegar to the milk for extra lift. I've also had success using 6 tablespoons aquafaba (chickpea brine) whipped to stiff peaks as a direct egg substitute. The cake will be slightly denser but still moist and flavorful. 🥚
Lower-Sugar Versions
Reduce the 2.25 cups granulated sugar to 1.5 cups and replace the remaining 0.75 cups with 0.75 cups monk fruit sweetener (like Lakanto) for a lower-sugar option. Use 1 cup unsweetened applesauce instead of 0.5 cups milk to maintain moisture. For the buttercream, reduce powdered sugar to 3 cups and add 1 teaspoon stevia powder for sweetness. The cake will still be tender but with fewer calories. 🍚
Nut-Free Considerations
When using dairy-free substitutes, ensure all ingredients are nut-free if allergies are a concern. Opt for sunflower seed butter instead of nut butters in any variations. Check labels on dairy-free butter and milk alternatives for cross-contamination warnings. I always double-check Miyoko's dairy-free butter and Oatly barista-style oat milk for nut-free certifications. Keep separate utensils and bowls for nut-free baking to avoid cross-contamination. 🌟
Nutrition facts
Frequently asked questions
Why does your recipe use vanilla bean extract instead of regular vanilla?
The vanilla bean extract delivers a richer, more complex flavor that store-bought extracts simply can't match. The real vanilla seeds add depth and subtle floral notes that make the buttercream truly special. For best results, scrape seeds from a high-quality vanilla bean and combine them with the extract.
How do I prevent my cake layers from drying out before frosting?
Wrap cooled cake layers in plastic wrap and refrigerate for up to 24 hours before frosting. This keeps them moist without making them soggy. Never frost a cake that's still warm—temperature differences cause condensation that ruins the buttercream's texture.
Can I make this cake in advance and store it?
Assemble the cake 1 day ahead and store it at room temperature in an airtight container. For longer storage, refrigerate for up to 3 days—bring to room temperature before serving. The buttercream rivers will look even more dramatic after chilling!
What's the best way to level my cake layers?
Use a serrated knife or cake leveler for clean, even layers. Dip the blade in hot water between cuts to prevent crumbs. For perfect circles, trace the cake pan rim with a pencil first. Leveling ensures your buttercream rivers will look professional and the cake will be stable.
How do I fix buttercream that's too soft or too stiff?
If too soft, chill the bowl for 10 minutes before beating again. Too stiff? Add 1-2 tablespoons milk or cream and mix gently. For temperature-sensitive buttercream, keep your kitchen at 70°F or cooler while working. The heavy whipping cream helps stabilize the texture!